
Easiest DIY Cedar Flower Bed You'll Ever Build
The German is an amazing gardener.
Me? Not so much.
But....I do know how to do things that make it appear as if I'm a gardener.
Gardening for wannabes...that's me!
Take this easy DIY flower bed, as an example.
Look at those clean cedar lines. Look at the barrier between grass and mulched goodness (yes, that is the remains of our Christmas tree in the bed). Look at one of the easiest DIY projects you'll ever tackle.
Seriously, are you looking?!

Oh, how I wished I had remembered to take the "before" pics.
This bed was lined with double stacked garden ties, hammered together with giant railroad tie nails.
The ties had deteriorated to the point that they were falling over on their sides, exposing the sharp nails points.
With Dexter and his squirrel-chasing-ways and a soon to be Sweet E running this backyard, changing out the ties was priority #1.
I should point out here that Husband and I working together on a DIY project is like purposely inserting your arm into a bee hive: SO MUCH STINGING!
It works best when we work alone, but some projects are easier with an extra set of hands.
~ A gentle reminder: OMT! uses Amazon referral links. When you do your shopping through the Amazon links on this page, you support the blog at no cost to yourself. It’s much appreciated!~
Before we settled on the cedar (we used 4x4x8 Western Red Cedar posts), we went through a few other ideas.
In the end, we chose cedar because of it's durability without needing to be treated against decay. This particular cedar is strong and straight; it's perfect for building a flower bed and should last for years and years to come without any upkeep.
Our bed measured 24' long, by 4' wide. We bought four posts, using three along the front and then cut the other post in half to use on the sides.
Then we used a couple of brackets Husband had laying around to connect the side posts to the front posts.
We used screws instead of nails to attach.
That way if we ever need to disassemble, it's much easier to do.
Looky:
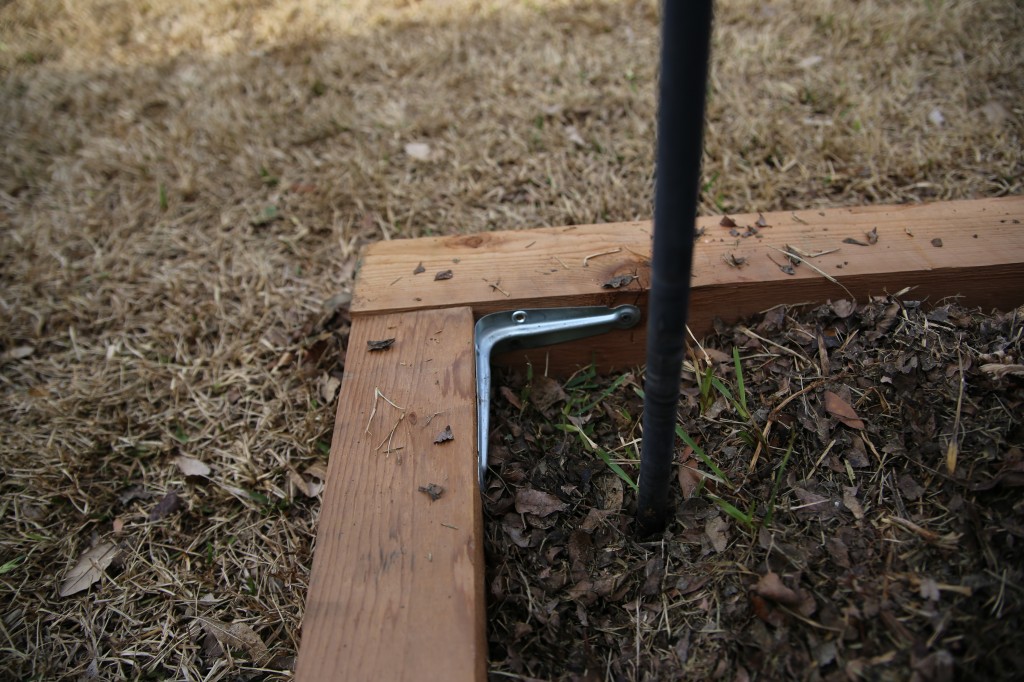
The three posts that made up the length of the bed were connected, on the inside, by something Husband MacGyvered out of some material that was left over from our new window installment.

He used metal snips and cut a piece about four inches long, then hammered it flat, so we could use screws to attached the metal thingy (DIY technical talk) to the cedar posts.
DIY, you're doing it right!

Initially, there was talk about connecting the frame of the bed to the fence, but it was secure enough as built.
We simply laid out the posts, connected the sides to the front posts first, then connected the lengthwise posts together.
We did have to dig a bit of the dirt out along the front, where the posts lined up, to make sure things were level.
Because it was already an established bed, that part was minimal.
We also had to back-fill a corner spot to bring up one side of the bed to achieve the aforementioned levelness (is that even a word?!).

Finished! Beautiful and easy. My kind of project.

The view from the other end (look closely and you can see the fire pit where OMT! enjoys adult beverages.

One more time from the front:
I swear, every time I look out the back door and see this simple, yet elegant, bed, it makes my heart sing.
From start (having materials on site) to finish, including Husband's ingenuity, we completed this project in under two hours.
Total cost of project: $66.12
While we could have used a less costly cedar, the project wouldn't have been as simple nor as quick to finish.
Plus, we won't have to worry about rot for years to come. Some things are worth the extra dough.
Bonus: I count this as the first project that Husband and I completed together that didn't feel like a beating.
DIY #winning!



The new bed looks great.....We have already replaced 4 raised garden beds this year.....makes a big difference. Thank you for posting this. 🙂
Happy to share. One of the things that makes me happiest about this bed is the cedar. Won't decay for 20 years! I likey!
ESO!!! Here from the Grand Social, and may I say, I'm very impressed. Fast, Frugal & Functional; Fantastico! Gonna keep this one on hand so Sweetie can get an idea or two. Gracias & BB2U.
Yes! All those things! I still love looking at it! Thank you for the love!
That's my kind of project!! Thanks for sharing via Family Fun Friday.
Glad to read it!
The garden looks great! I'm going to have to remember this when we're ready to redo our poor excuse of a garden =)
I was shocked how easy it was, even with the little bit of MacGyvering that went on. Good luck!
I need someone to build me a flower bed like this!
Grab a friend and get to it, momma! Or better yet, find MacGyver! That dude can do anything.
I am so proud of you for building this awesome flower bed!! Thank you for linking up at Wonderful Wednesdays, your post has been featured: 12 Spring Gardening Tips. Congrats!! 🙂
“hugs” Crystelle
Thanks for the vote of confidence! We had fun building this easy bed.