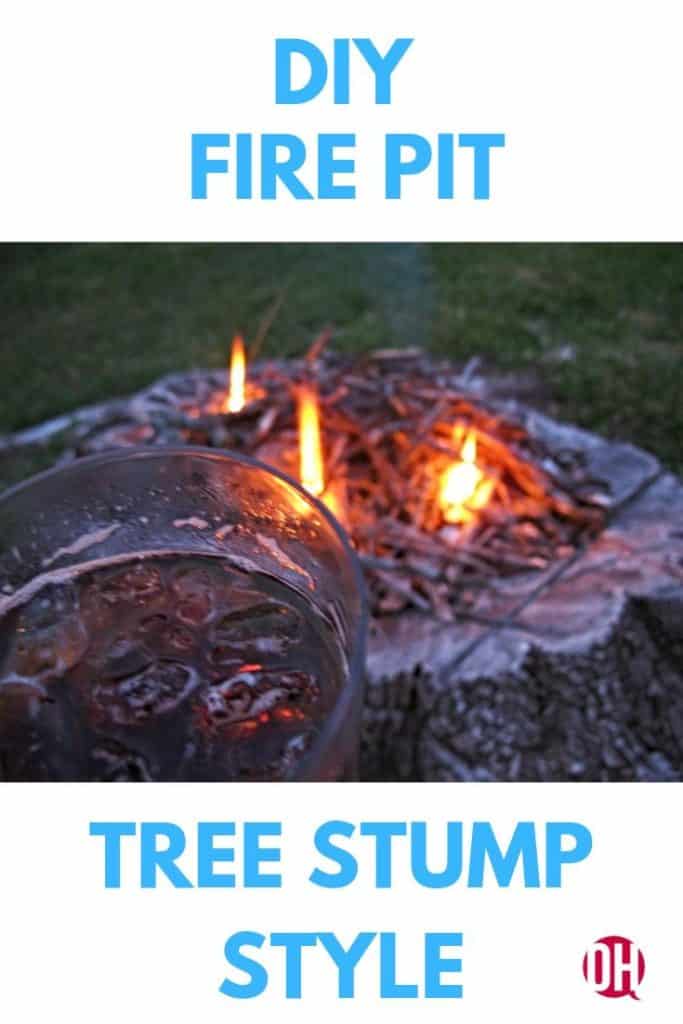
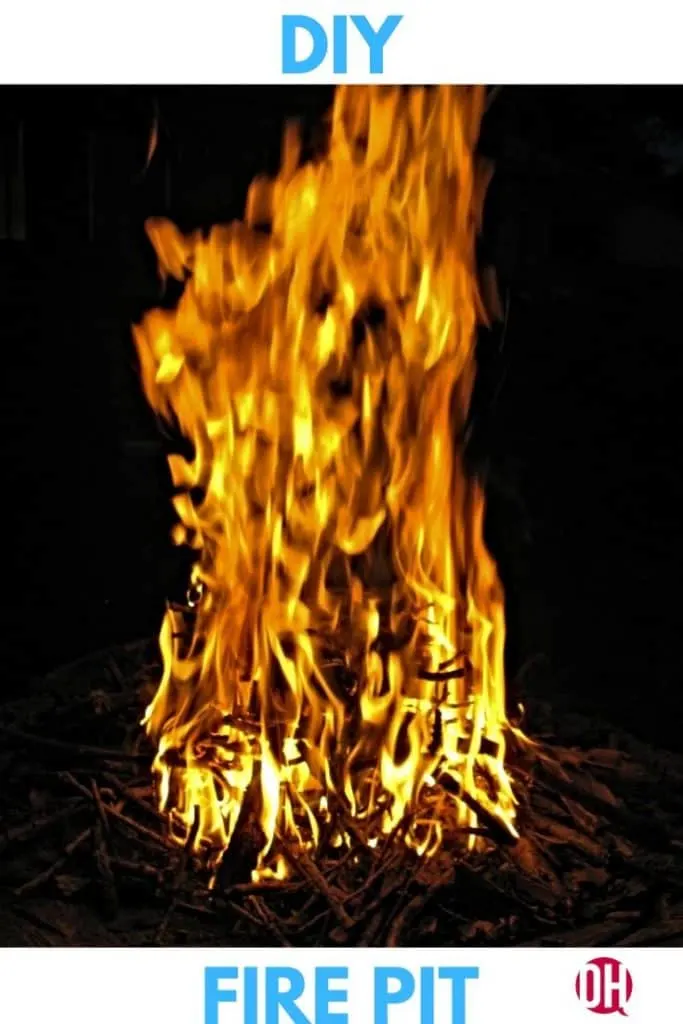
DIY Tree Stump Fire Pit Tutorial
…or…
How To Burn A Tree Stump!
Since publishing this post, all the way back in 2013, folks have strong opinions both ways. Either you love this idea or DANGER DANGER! We loved it in the beginning and all the way to the end. No matter how you feel, I hope you enjoy the adventure of what we did and the fun along the way.
This post offers you information on the granddaddy of all hillbilly DIY ideas: when you need a stump removed – no need to call a service to grind that stump into oblivion.
No siree, JIM BOB!
Instead of grinding the stump when we cut down the giant tree, we made a fire pit out of it, which gave us years of enjoyment!
I’m gonna show you how we made our very own tree stump fire pit!
BUT, SAFETY FIRST: This is ONLY how we did it, and I am not advising YOU how to do a tree stump fire pit. Simply offering information.


A Backyard Fire Pit In Three Easy Steps
This is how we made one of our favorite DIY projects, a DIY fire pit from a tree stump, come to life:
- Chop down a big as
h tree. (really, any big tree will do) - Have the stump properly shaped for burning. (yes, the crew will give you a side-eye. channel yer inner Granny Clampett!)
- Burn ALL THE THINGS! (burn the random collection of twigs and cut branches from the felled tree! and s’mores! and all those pesky love letters from yer dirty dirty ex)
After writing this fire pit post, I was shocked to find it’s one of the most popular posts I have ever written (but not as popular as chocolate cake!).
You!
You are my people.
You get me and I get you.
Who knew so many of you were looking to make a hobo pit like we did!
Now I know and I’m so glad you came to check thangs out.
Let’s get to it!

BEFORE WE BEGIN, HERE’S IMPORTANT INFORMATION ABOUT BURNING A TREE STUMP:
How to burn a tree stump?
Should you burn a tree stump?
Is stump burning really a thang?
Your questions answered.
#1: This Information Is PURELY For Your Entertainment
This post is about how we handled a new (read: green – and less likely to burn out of control) tree stump – I am NOT recommending you do this at home.
This is simply for you to read and decide for yourself.
Fun Fact: Loads of folks will decide I have lost my mind, and that’s okay.
Just know, our stump-burning ways were done with the UPMOST safety practices in mind.
#2: SAFETY FIRST If You Decide To Burn A Tree Stump
Always have copious amounts of water at your disposal.
Fires can be unpredictable. A handy hose, ready to go, is always recommended.
We would literally drag our hose to a few feet of the stump each and every time we lit that bad boy.
#3: Never Ever EVER Leave A Fire Unattended
You’d be surprised how many folks will walk away from a fire in a fire pit.
Like an active fire, you know, with flames and embers. Just walkin’ away like Smokey Bear* approved.
* FUN FACT: his name is actually Smokey Bear, without the “the” added.
All the nopes.
Don’t do it.
Now that you have the safety info, let’s get to it!
Ever Google Tree Stump Ideas?
If you do, you get some fun, weird, and ugly ideas.
You mostly get planter ideas.
This is kinda that, except it’s a planter for FIIIIIIIRRRREEEE!
^ how I hear it in mah head – every. danged. time.
Be Careful
That’s the number one thing I advise. You must have a water source nearby. You must to watch the stump carefully. You just have to be…careful!
Why A Tree Stump Fire Pit Instead Of Traditional Tree Stump Removal?
Simple. Money and fun.
We thought it would be fun and it would save us the cost of having the stump either dug up or ground down.
The plan was to safely burn it over a couple of year’s time, enjoy the fires, and then once burned sufficiently, cover the area with grass.
Safety glasses on, folks.
How To Rot A Tree Stump
This is basically what this post is about – how to rot a tree stump fast!
TL;DR:
- Have a dead or dying tree.
- Cut stump low and semi-inverted
- Drag hose within reach.
- Start burning all the things.
- Always remember, this is an entertainment post. I asm not advising you do the same, only showing you what we did!
- Fire = danger.
- Proceed with caution.
- Never leave a fire unattended.
Cut Down A Tree
#1: Have A Dead Or Dying Tree That Must Be Taken Down
Consider a removal company for this task, especially if the tree is a giant like ours was.
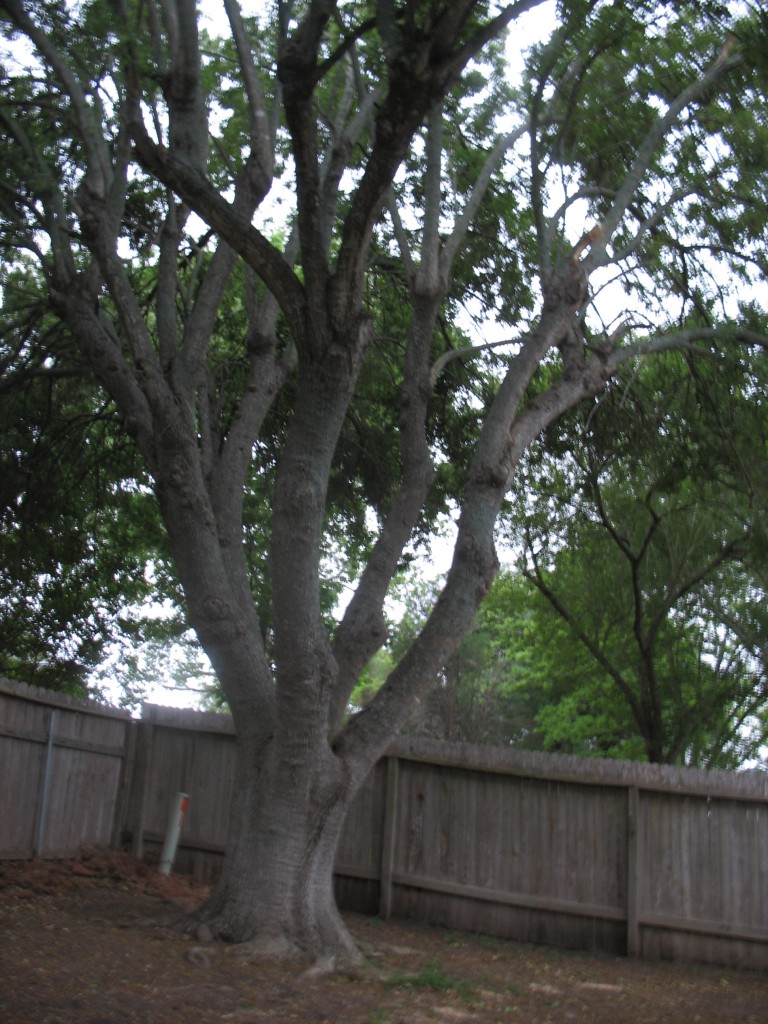

This was our beloved giant ash tree, or as we lovingly referred to it: the Big Ass Tree (clever, bordering on the profane is a gift…).
Ash trees typically have a lifespan of about 30 years and that’s pushing it.
This one was 35-years plus and it was throwing off branches the size of mid-sized cars; it was time for it to come down.
Our arborist said it was a testament to our care that it had lived so long and looked so good, but that once the giant limbs start breaking off, it’s time to bring down the entire tree, or risk it coming down during a storm.
The tree shaded most of our house, but the nail in its coffin was that it was located in close proximity to our bedroom.
I’d get out of bed during every violent storm to see if it was gonna come crashing down and crush us.
Can’t be having that kind of nonsense.
We said our sad goodbyes and took down that mammoth badboy.
Cut Tree Stump
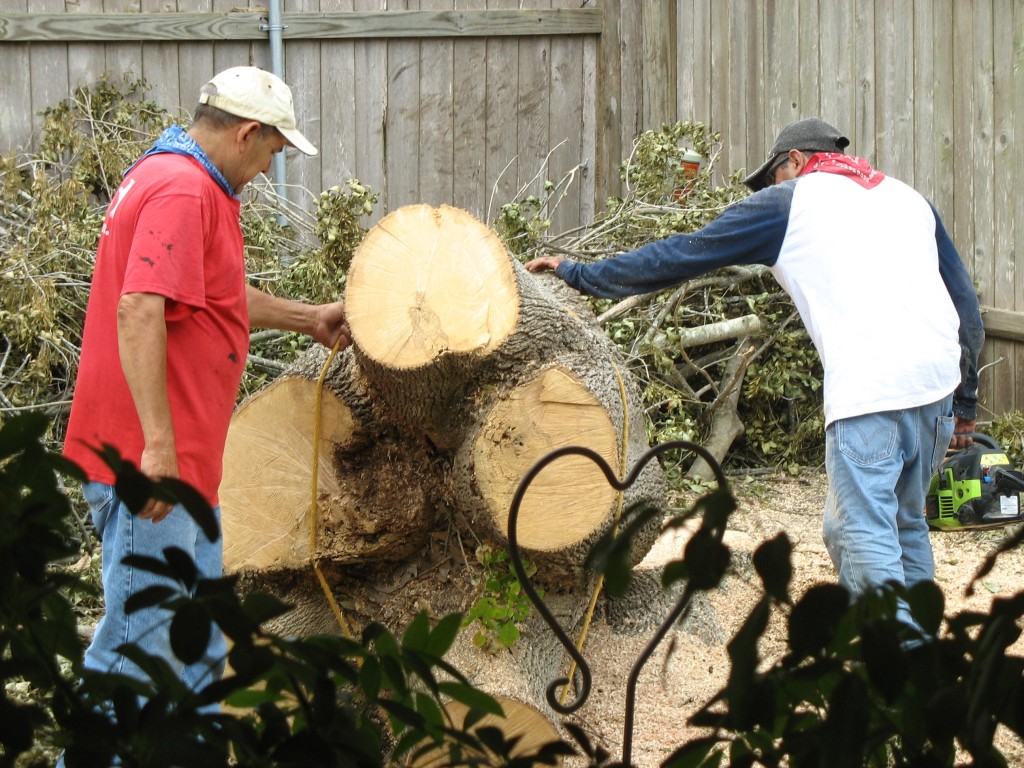
#2: Have The Crew Cut The Tree Stump Low And Semi-Inverted.
Or DIY, if you’re that much of a badass by cutting down your own giant trees.
The poor crew. Out tree was bigger than anyone imagined.
As they kept cutting; it seemingly grew new branches.
So. Much. Tree.
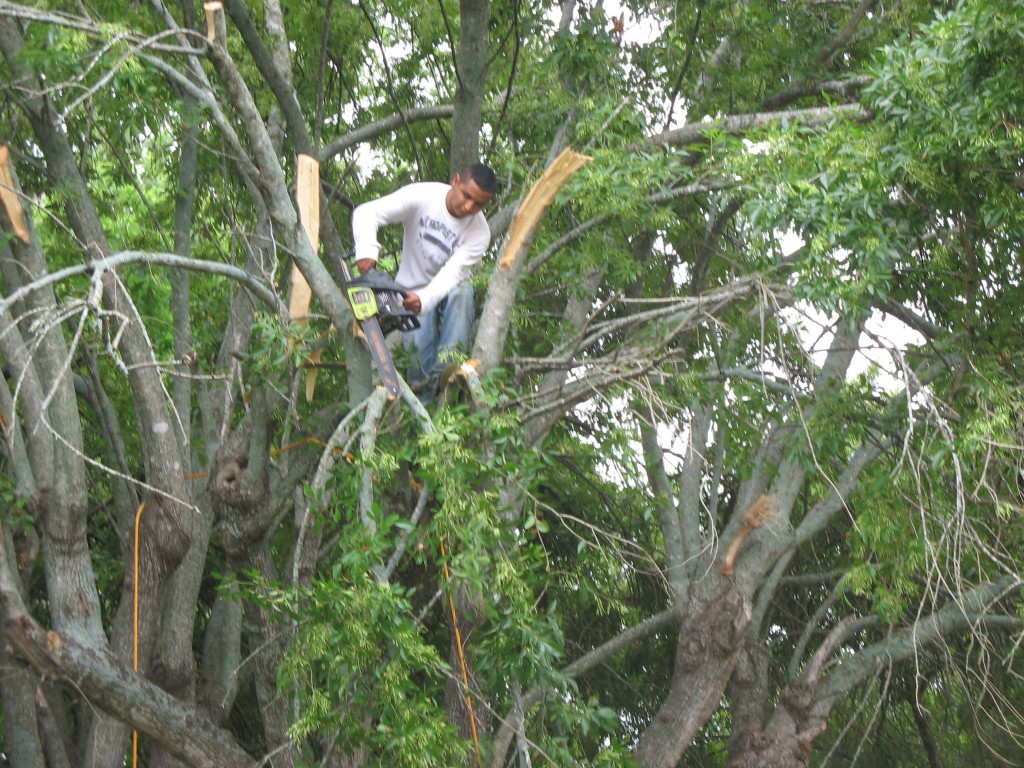

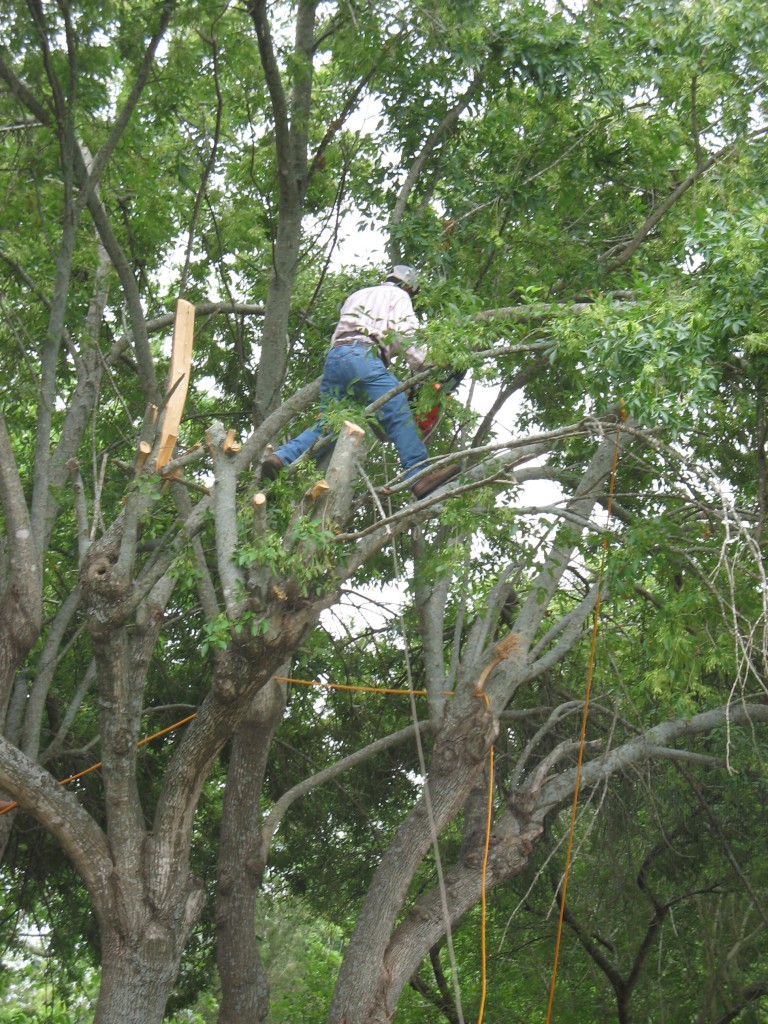
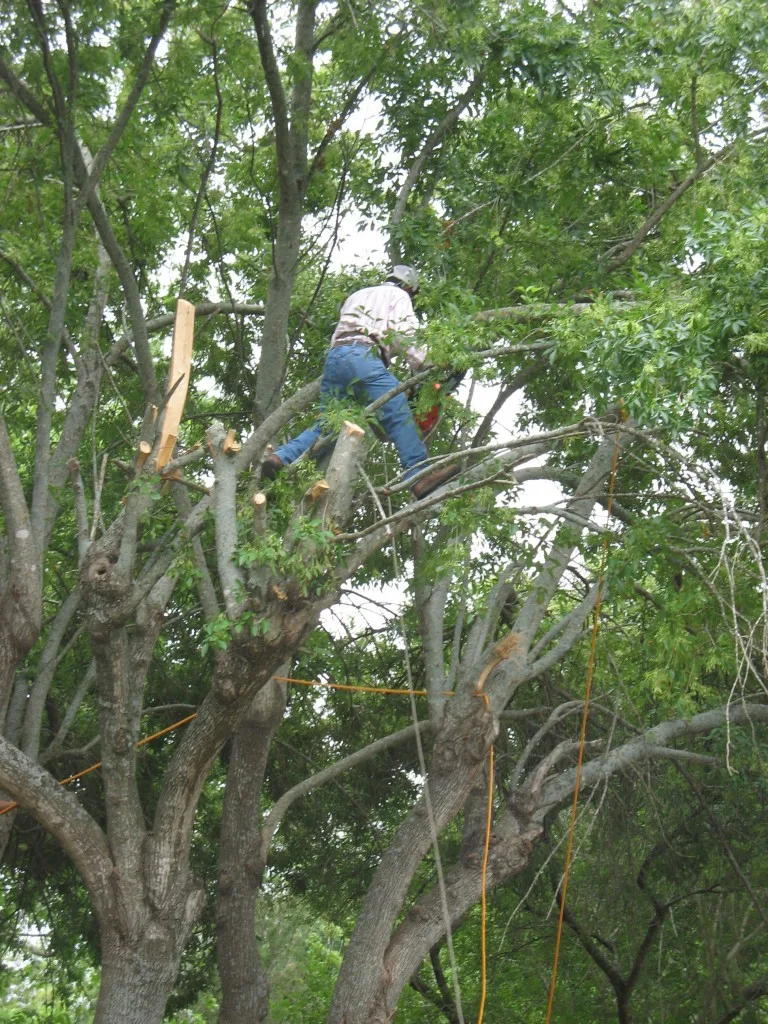
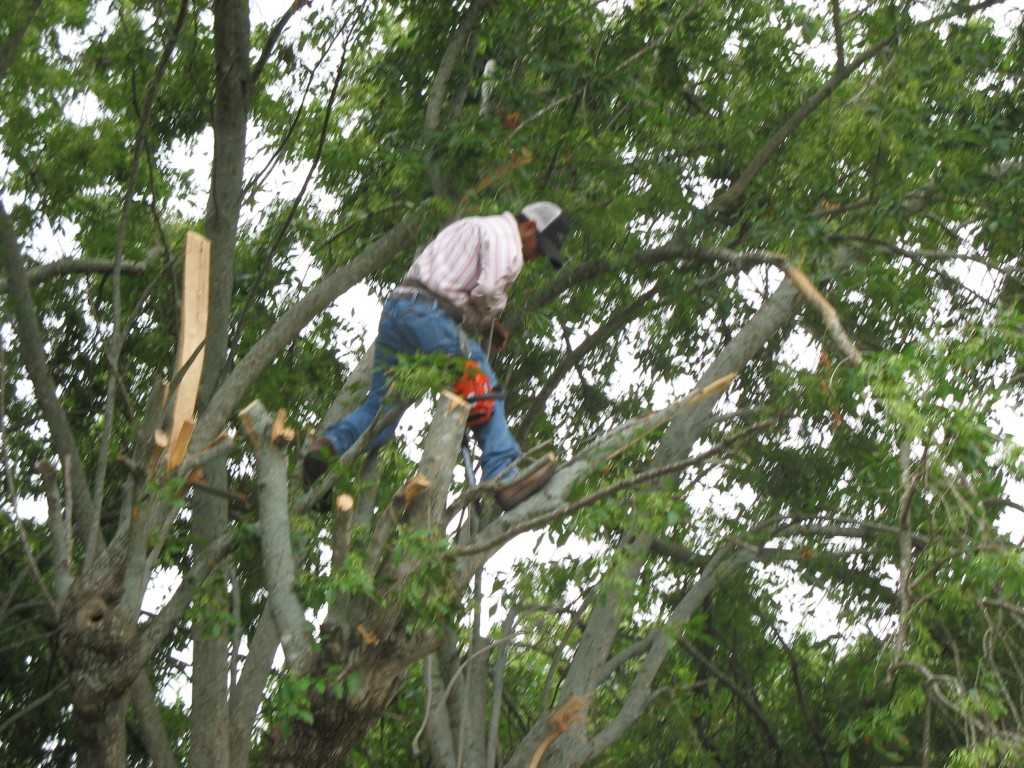

Soon, they got it down to working size.
Come on, fire pit!
Truth is, this pic still makes me sad, because it was a great tree and I hated to see it go.

I explained what I was shooting for in the pit and the guys got to work:

PULL! PUSH!


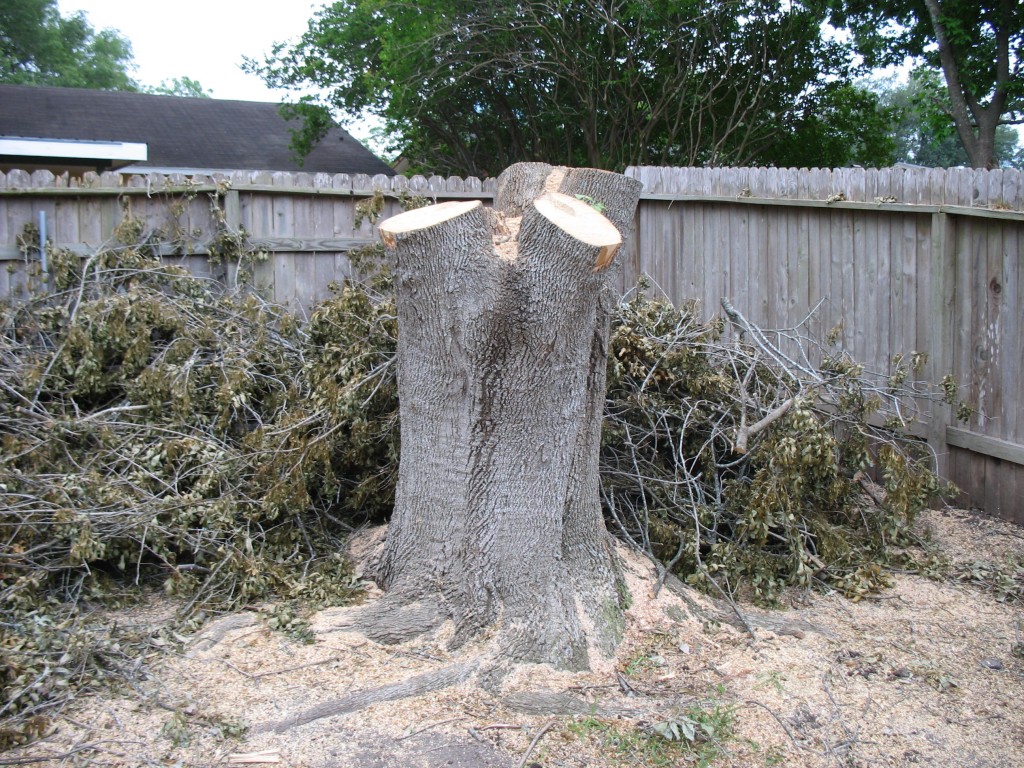
The stump was a monster.
Success (took a few hours of work and discussion)!

The desolate scene of the crime. Things were looking bleak.

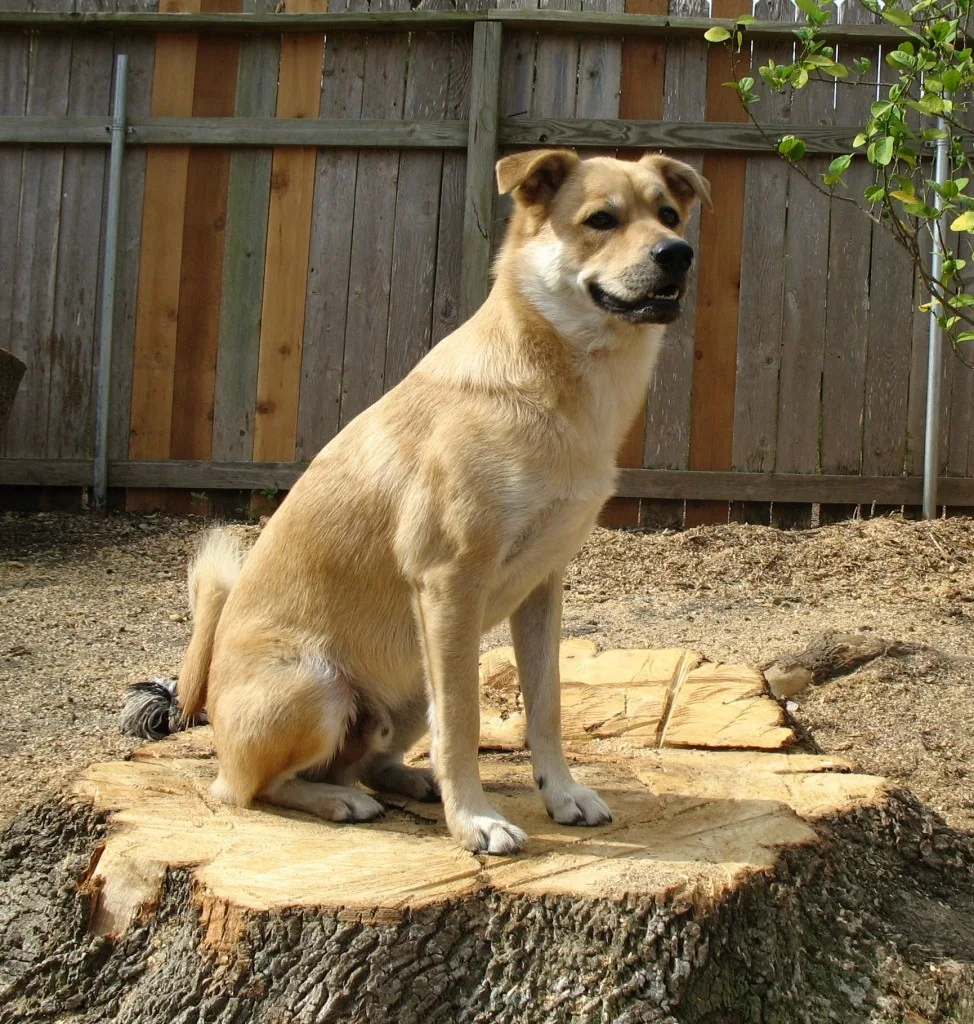
Not for Dexter: MINE!
The minute the crew left, he declared the stump his.

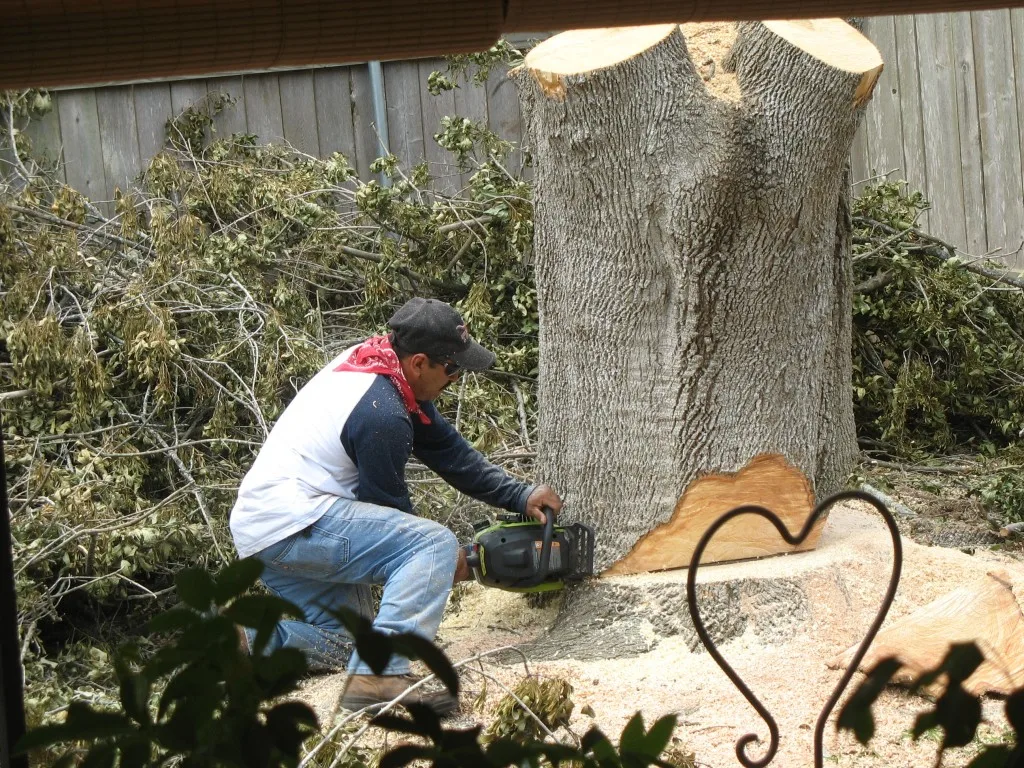
Cut To Size
After The Stump Was Cut To A Manageable Size, We Advised The Crew We Really Wanted A DIY Fire Pit
“A what,” they asked?
“We want a tree stump fire pit.”
We had to drive home that we weren’t kidding!
Oh, the looks they gave us.
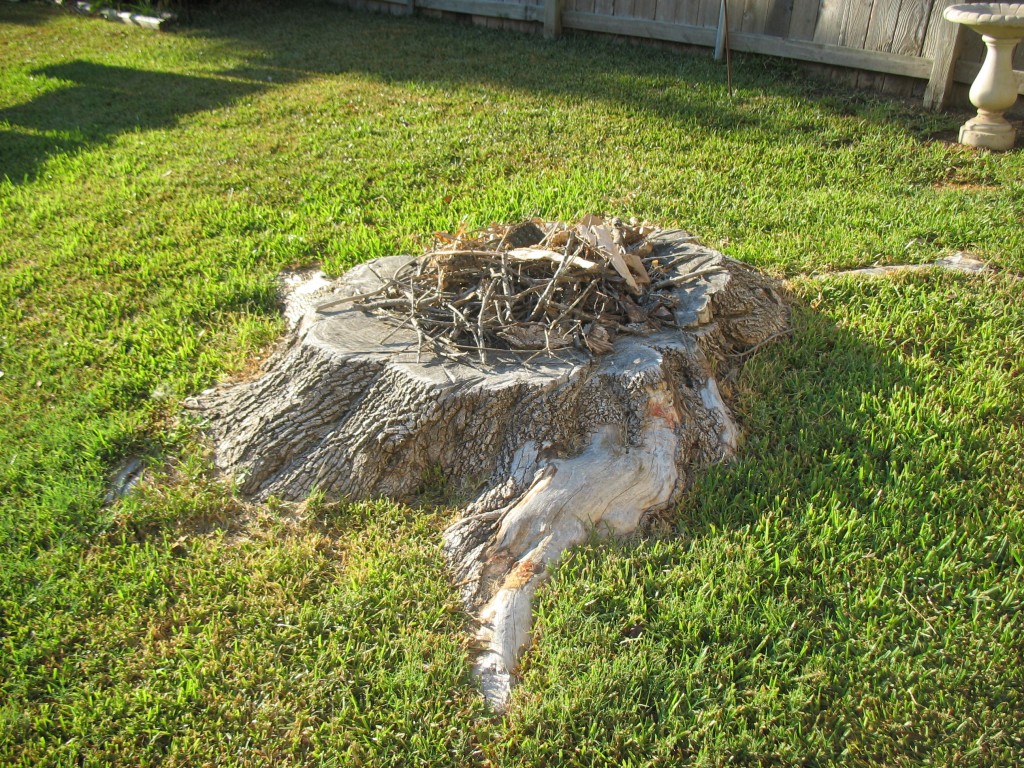
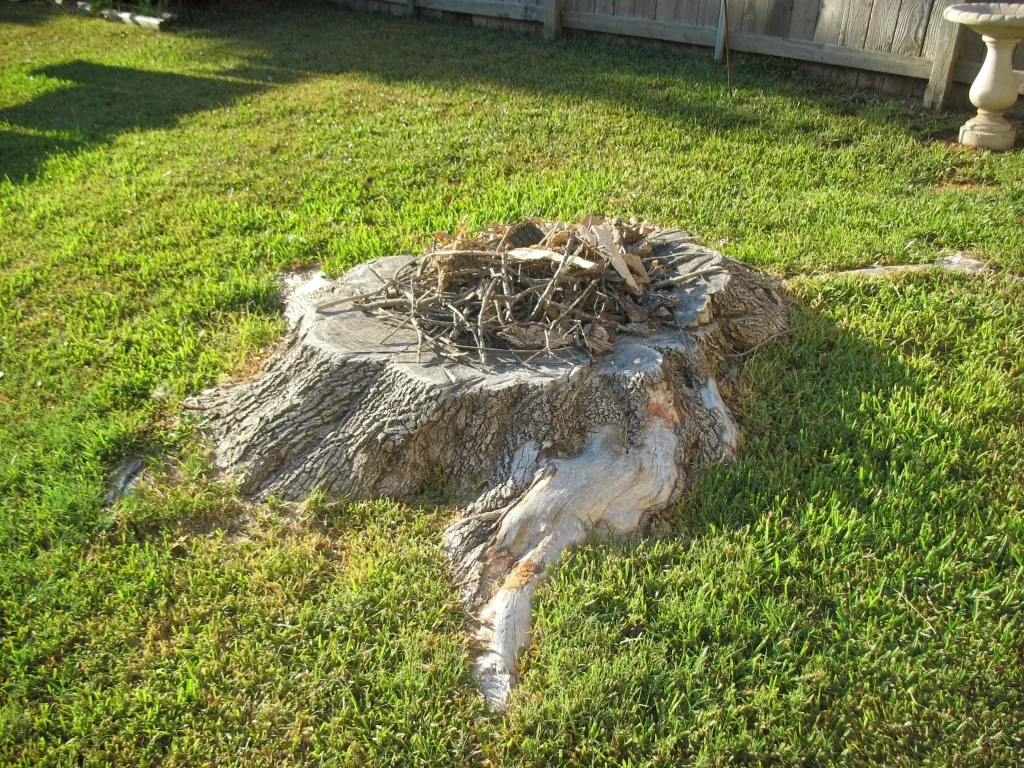
We knew we wanted a secure place to place the wood to be burned, so we had them cut a basic “v” into the stump.
The inversion: the inside was cut in a slight V angle, so the soon-to-be burning wood would have a place to rest.
BRILLIANT!
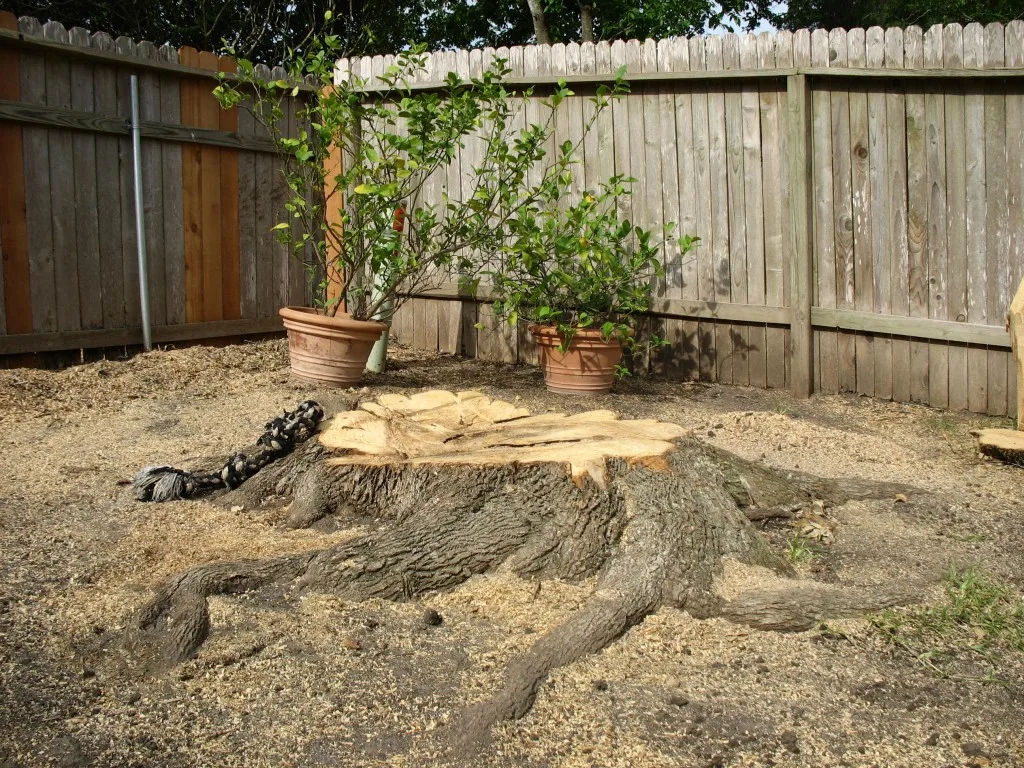
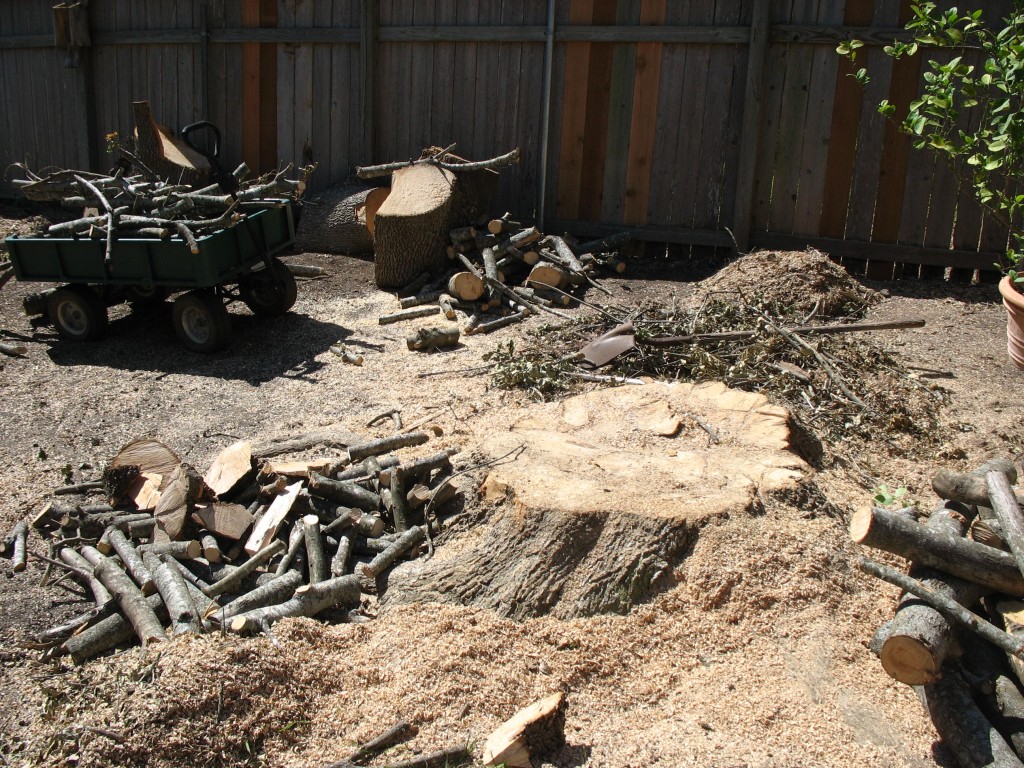
DIY Pre Stump Fire Pit Building Skilz
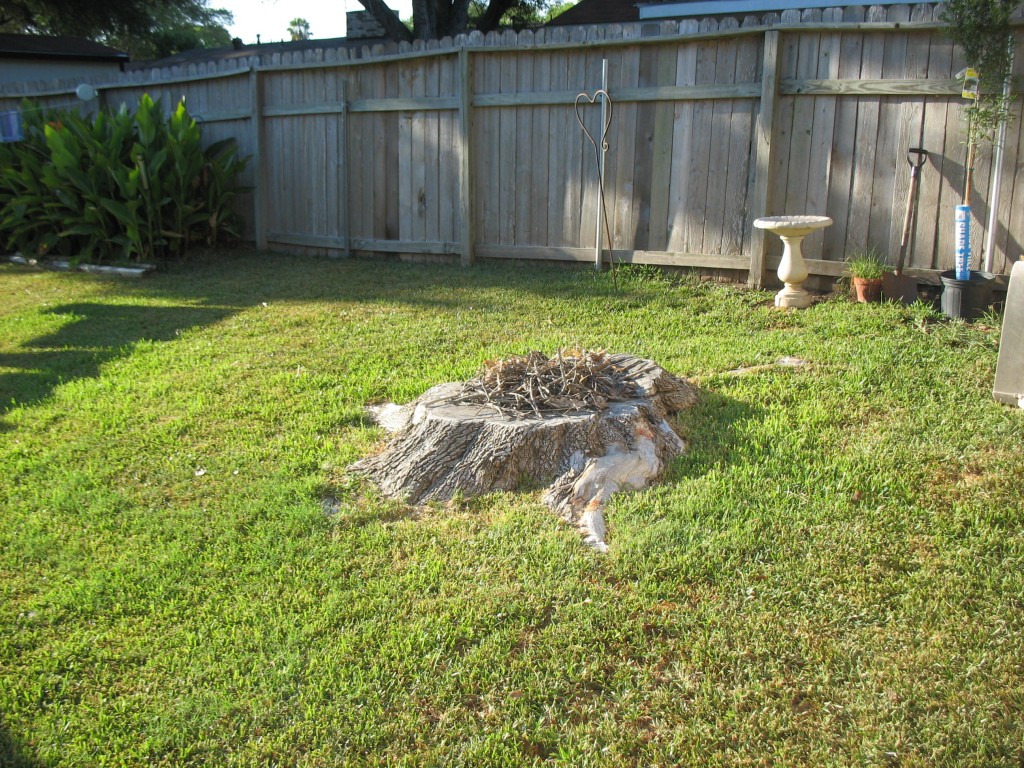
This was what the sad yard and pit looked like last summer after everything was cleaned and we were ready to burn stuff.
The tree was so dense that even Texas shade-tolerant St. Augustine grass refused to grow underneath it.

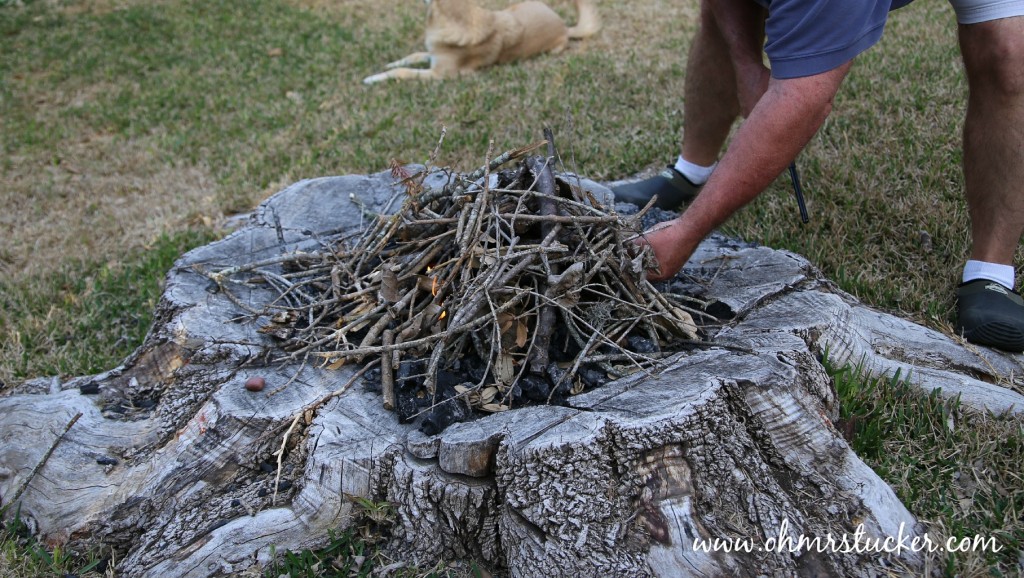
Burning Stump
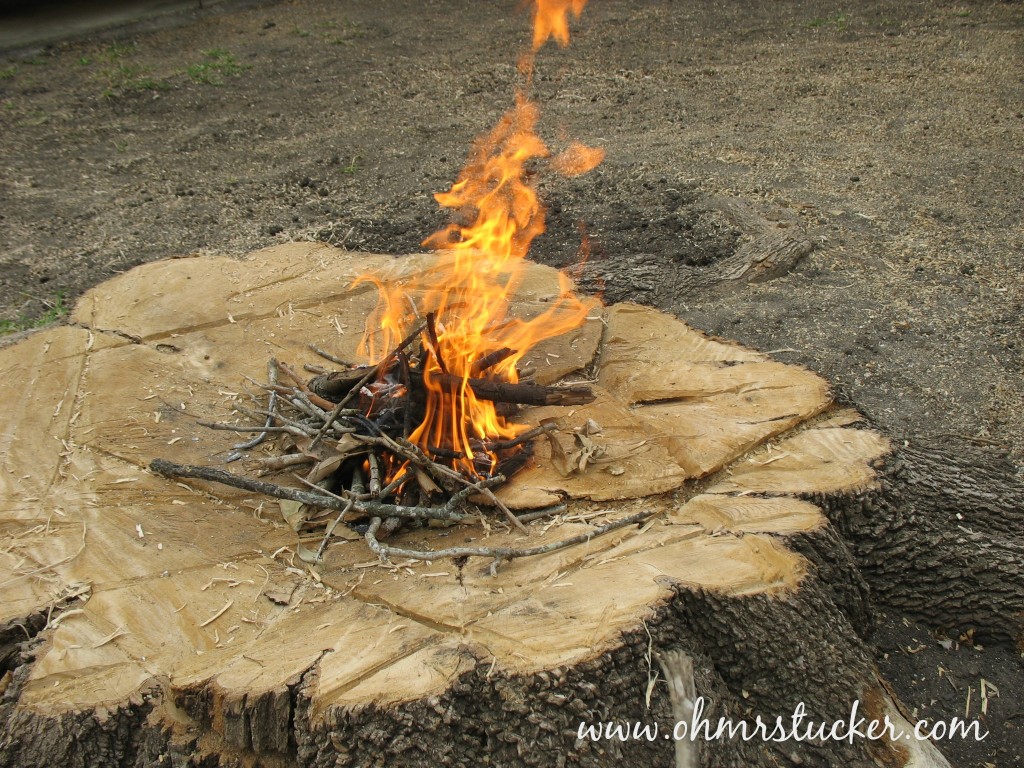
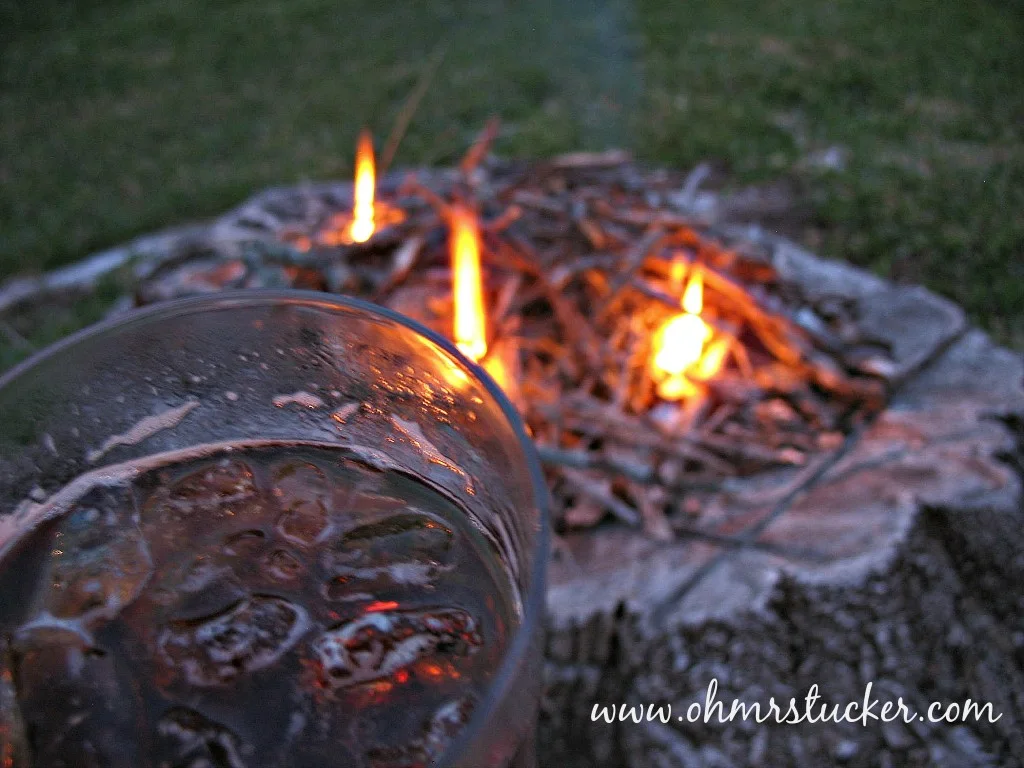
#3: Start Burning ALL THE THINGS In Your Stump, AKA, New Fire Pit.
Then we built our first fire and both of us were hooked.
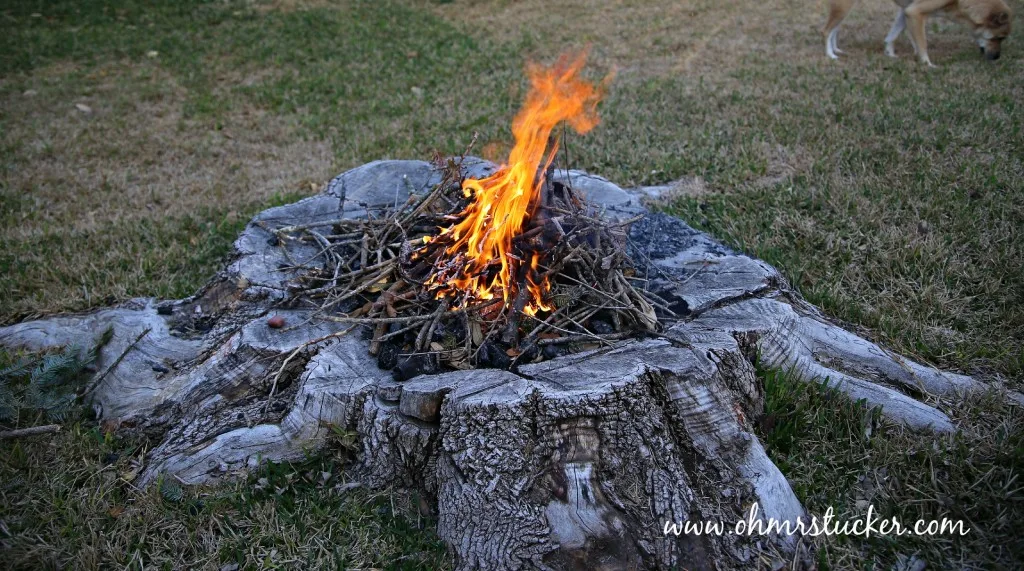
All Hail, Tiny Fire!
That first year, we enjoyed the fire pit frequently (even on hella hot days) and loved that we didn’t pull the stump out.
Since these first pics, we have sodded the area and had many many fires.
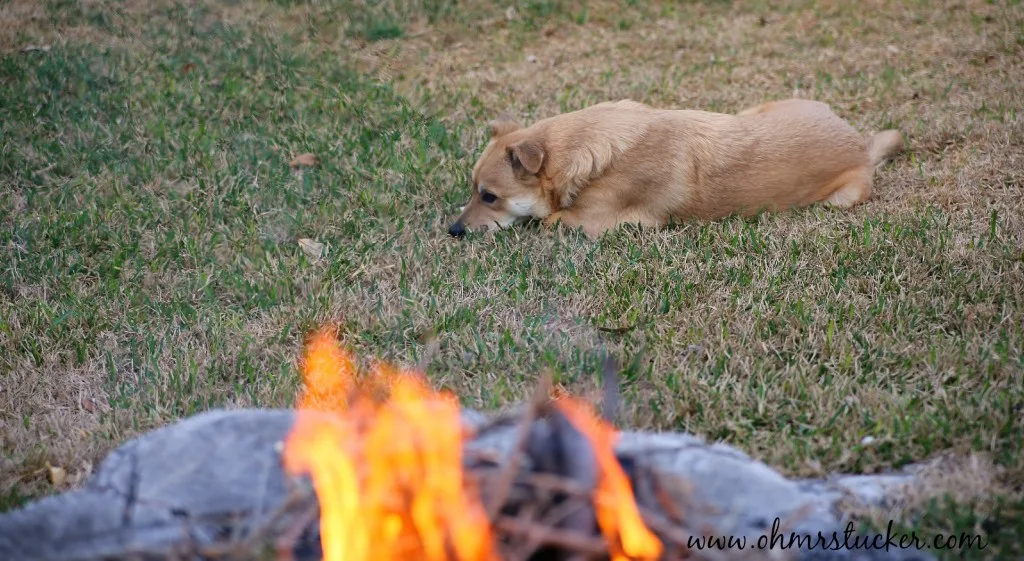
Although, Dexter’s enthusiasm has waned; he’s not too happy with our choice.
He hates when we have a fire.
We’ve bribed him with treats, but no-go.
He refuses to sit with us.
REJECTED!

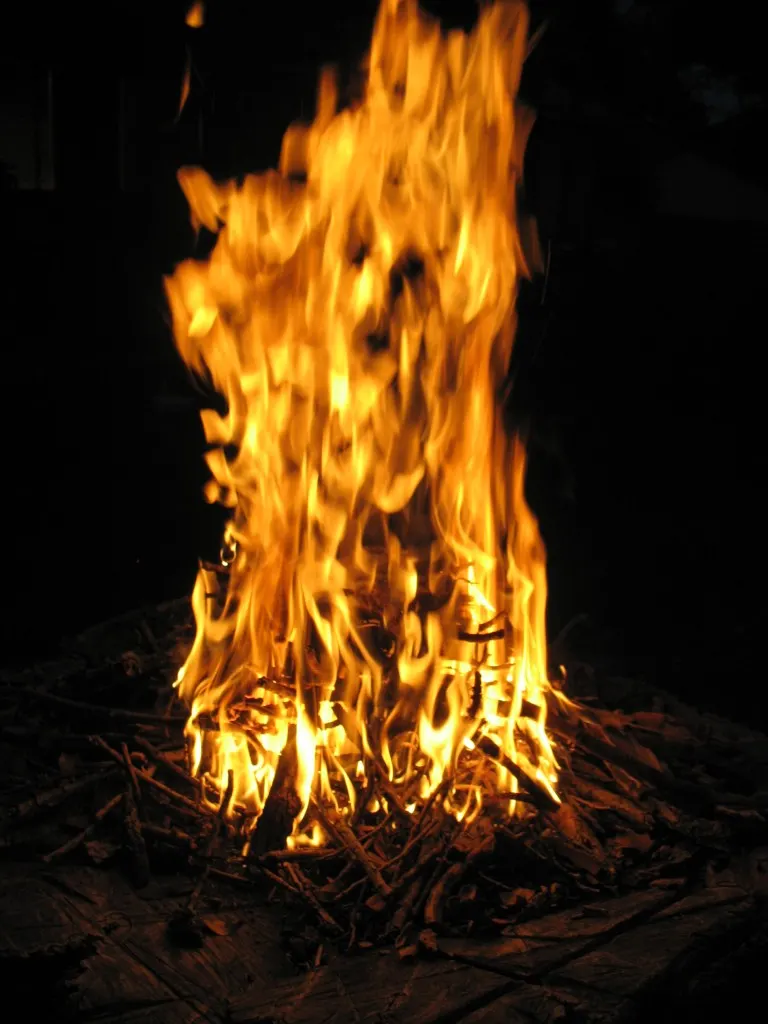
We’ve come a long way since that tiny first fire.
This is what our fires look like a few years later:
Build it and OMT! will come!

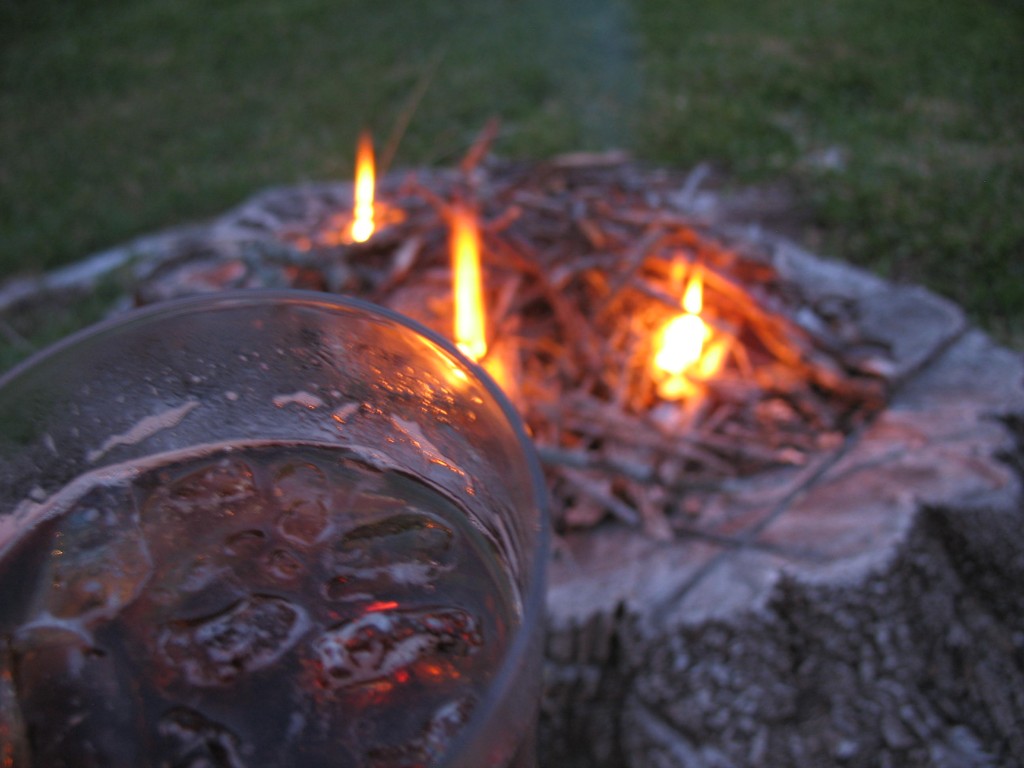
Grab a drink and let the fire get started:

FII-YAH!

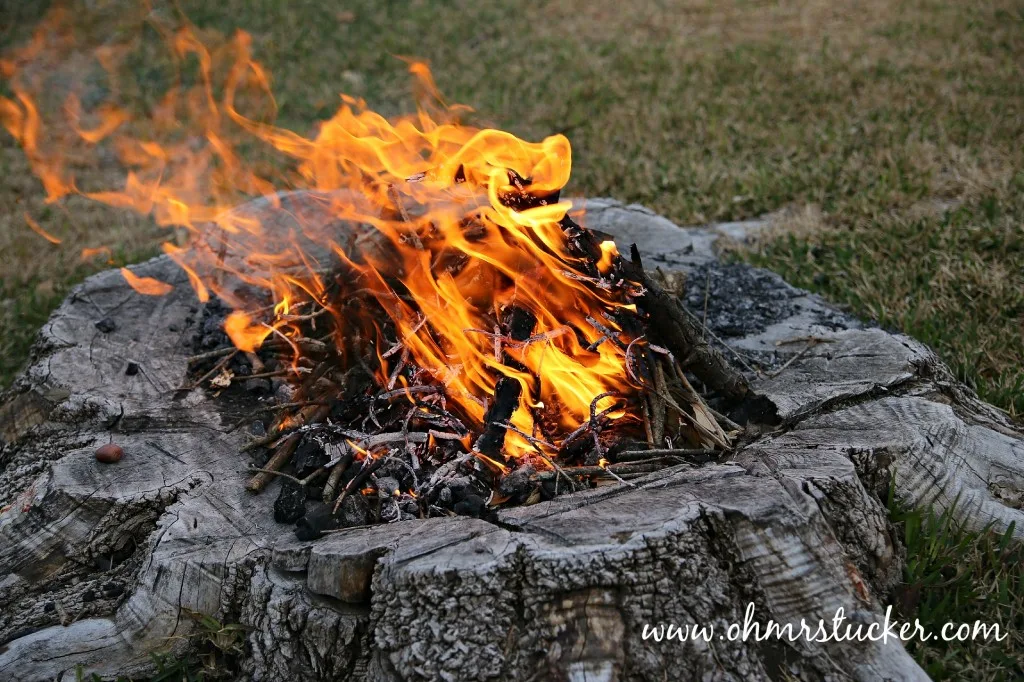 This is livin’, yall.
We keep going until either the wood is spent:

Or the drinks (whiskey – beer – strawberry smoothie!) are:

Tree Stump Ideas
The Tree Stump Ideas Are Endless
We’re thinking of adding a fun modification, since Sweet E will be hanging out with us at the pit.
Garry is going to find/build a grate with legs that can be attached to the pit when we want to grill a few hot dogs and a small pot of chili.
Brilliant!
Be Careful
While The Idea Of Burning A Tree Stump Was Fun, There Were Some Concerns.
There is some concern that by using the old stump, we might accidentally ignite a fire in the root system, so here is what we did:
- The tree was green when we cut it and it hasn’t been a problem.
- Extinguish all fires with an overabundance of water from the hose after we are done having our fun.
- If we ever conclude there is a danger, which we monitor closely, we’ll proceed from there with a new plan.
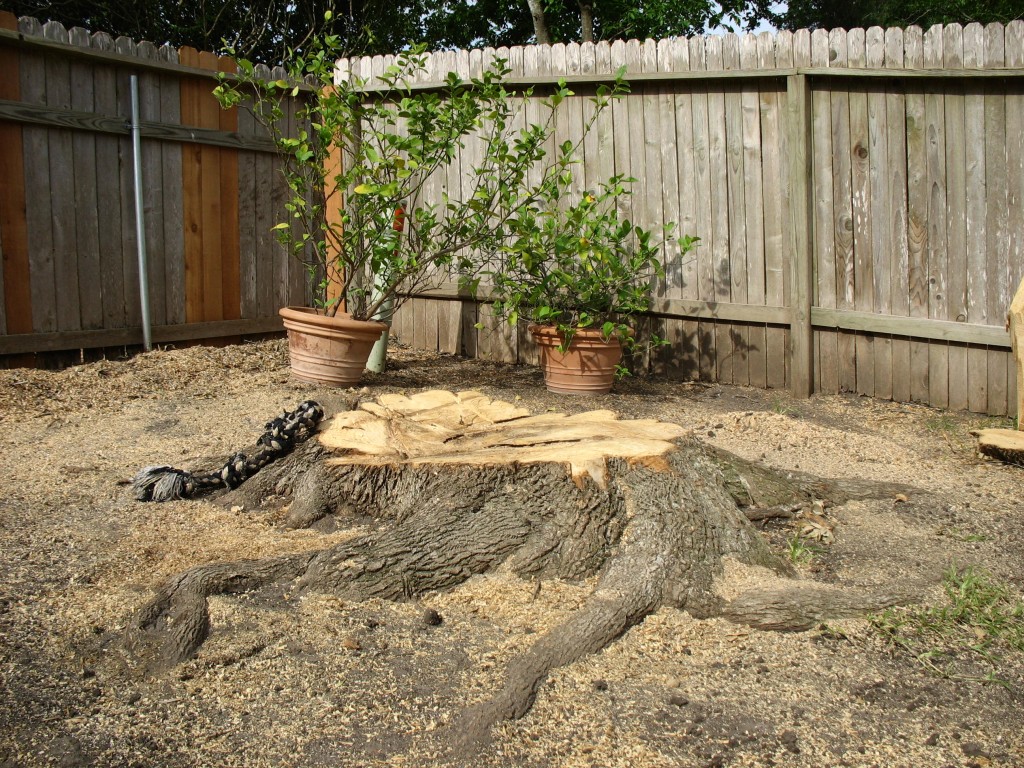
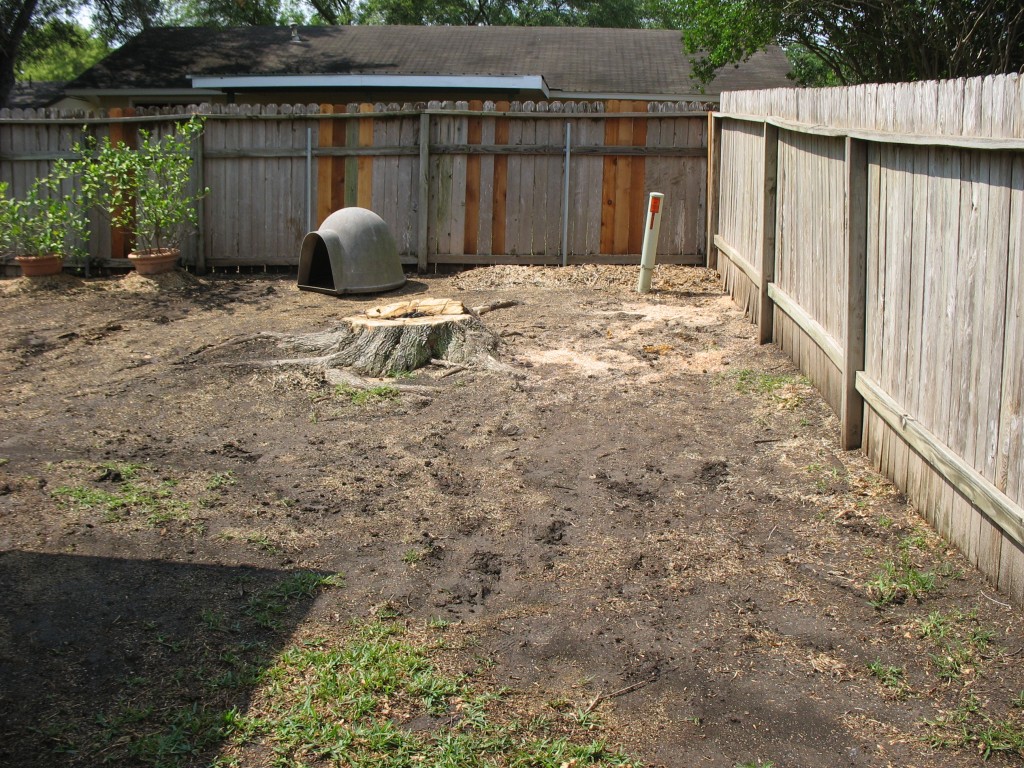
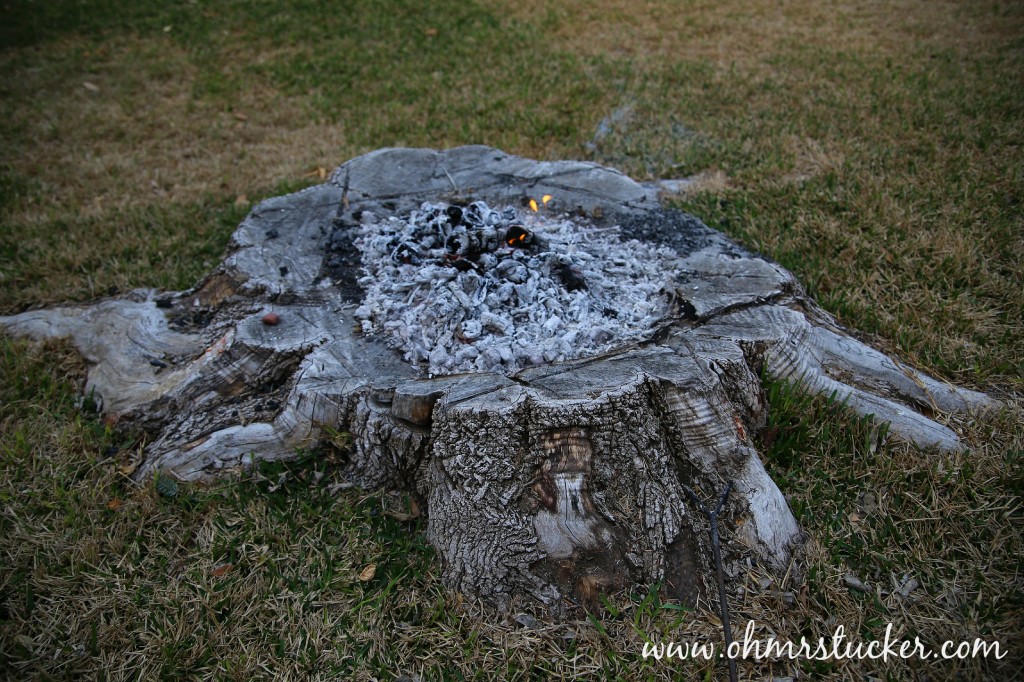
After A Year Of Burning The Stump…
This is what the pit looked like after a year or so of burning.

As you can see, progress was being made, but since the tree was green when we started very little of the stump had given way.
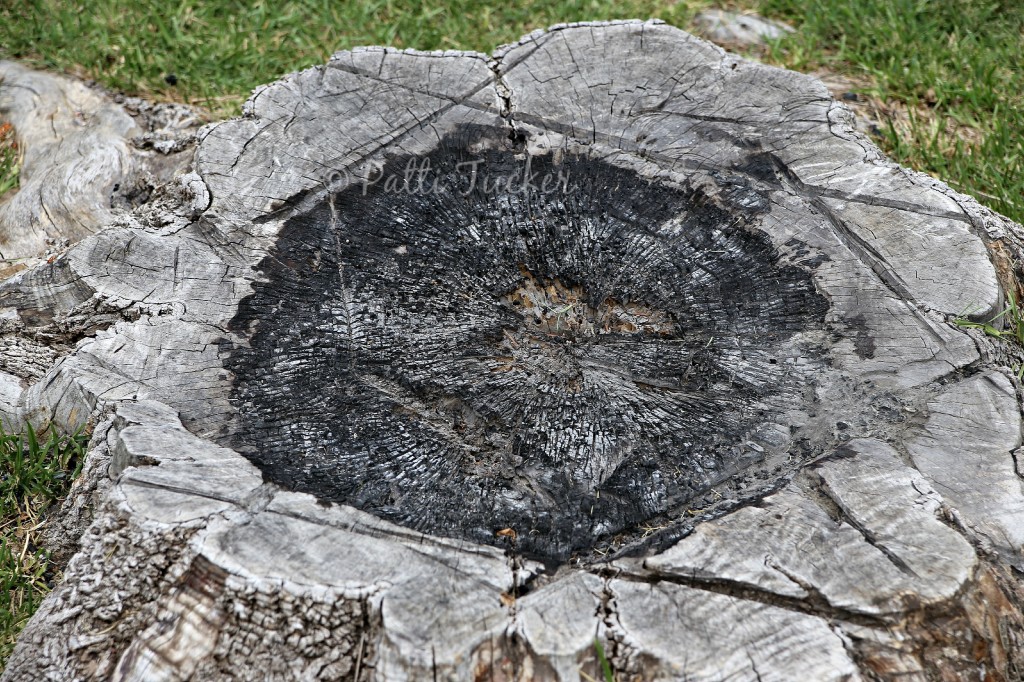
With a little TLC and some new sod, this is what she looked like the next year:
You can see that the grass has fully grown in and that the remaining tree roots add an interesting design to the hillbilly fire pit.

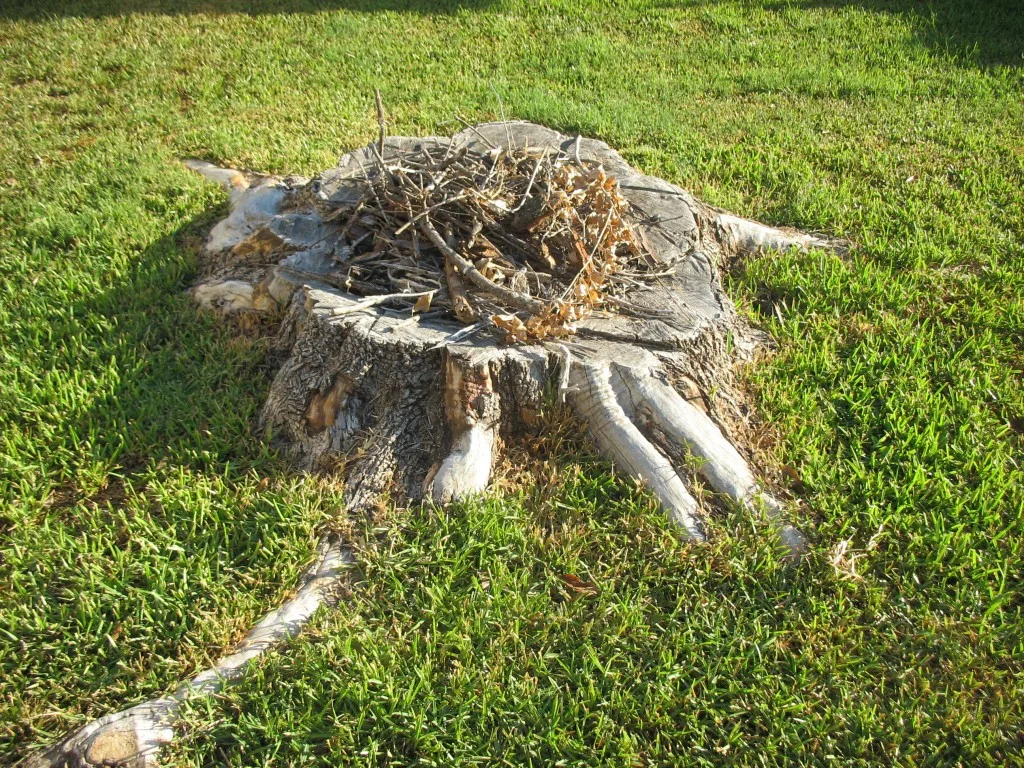
Underneath the kindling, is a burnt out spot that grows deeper with each fire. Once the pit burns down far enough, we’ll add stone around the perimeter to retain the shape:

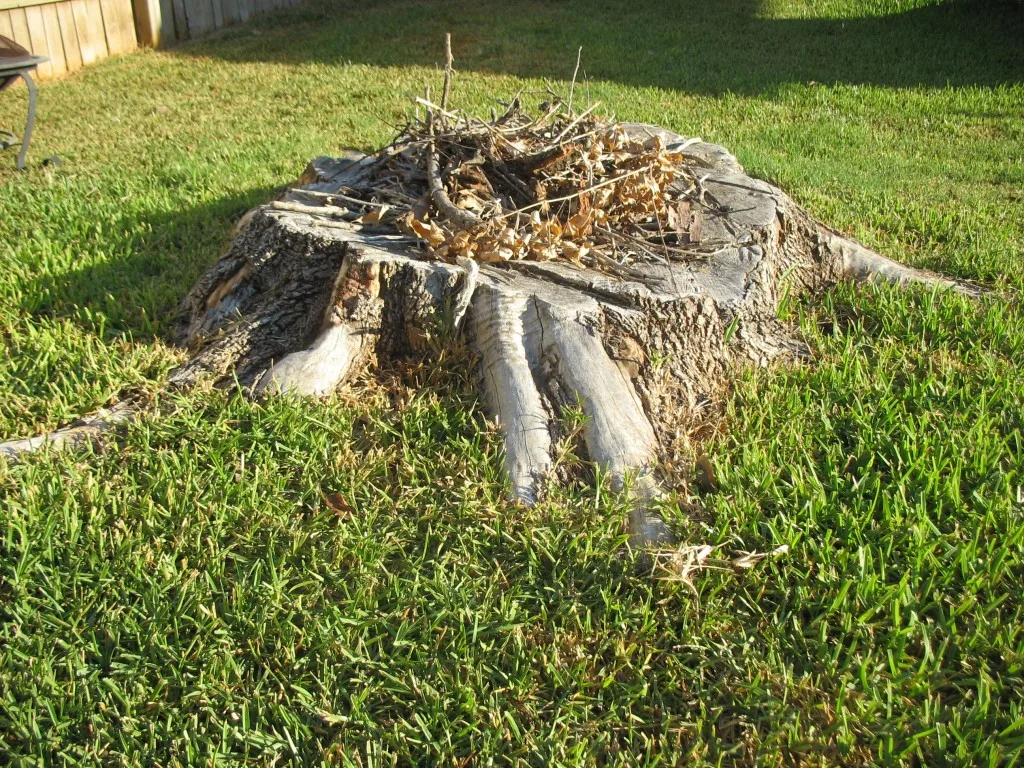
Usually there are chairs and a small table out here.
After all, one needs sustenance and adult beverages if one is going to engage in a proper fire pit conversation.

Plant Holder Or Fire Pit?
Making a fire pit out of your tree stump is better than using your tree stump as a table for your potted plants!
Take that Google search!
So far, so good, but as for you and your stump pit, err on the side of caution.
If you think there is a danger to igniting anything other than the stump, don’t do it!
But, if you’re not as hesitant…
THIS!

And most definitely, more of this:

When I first ventured this idea to Garry, he was skeptical.
So Texas hillbilly!
Now?
Now, he loves that pit as much as I do.
Nothing better after a long day than to head out back, sit by a roaring fire (although, not in the summer. that’s just torture) and let everything go.
Any one else with a DIY fire pit from a tree?
Anyone?!
Hands Down, This Has Been One Of Our Favorite DIY Projects
It’s great to have a unique fire pit to have a drink by at the end of the week or to start the week.
Can’t wait to get the grate and make some memories with Sweet E.
Like Garry said, “We had so much fun as kids by the fire when we went camping.”
To which I added, “The difference this time will be that we’ll have the luxury of bathrooms and soft beds.”
Yeah, I’m not so much a camper…
What Does The Tree Stump Fire Pit Look Like Today?
It’s been 8 years since I originally wrote this post, and today there is nothing but grass where the stump once was.
It’s An Old Stump, Ready To GO!
We successfully burned the stump to the point where we could easily remove what was left.
After that, we covered the hole with new dirt and sod.
You’d never know a giant tree was once in that spot.
We didn’t have a problem with the root system burning, but maybe that was because we used abundant caution when extinguishing the fire each time we enjoyed the fire pit.
As I stated in the beginning of this post: SAFETY FIRST!
Happy DIYing, mah babies!

Tree Stump Fire Pit
Here's how we made a new tree stump into a fire pit.
Materials
- One tree that needs to be taken down.
Tools
- Chainsaw
- Wagon, to haul off large limbs/wood
- Heavy Duty Gloves
Instructions
- Have a dead or dying tree that needs to be taken down.
- Have the crew cut the tree stump low and semi-inverted.
- Start burning ALL THE THINGS in your stump, aka, new fire pit.
Notes
SAFETY FIRST: This is ONLY how we did it, and I am not advising YOU how to do a tree stump fire pit. Simply offering information.
Recommended Products
As an Amazon Associate and member of other affiliate programs, I earn from qualifying purchases.


Original post: August 14, 2013. Updated Post: May 5, 2025.
~I am not a fire pit making professional, so know that this tutorial is purely my experience of what we did. Proceed with caution and safety for your own tree stump fire pit situation.~
If you liked this DIY post, you might wanna check these out:
Inexpensive Patio Curtain Ideas
This is hands down our most used DIY project. We still use the curtains, albeit we update them regularly for fun!


DIY Portable Photo Light Box
Can’t afford a professional light box, or you just like making stuff yourself? THIS! It’s easy to use and easy to store. I used mine FOR YEARS!


Jalapeno and Fresno Chili Poppers
When you’re done with your DIY projects, head to the kitchen for some jalepeno poppers yum! So easy to make – way easier to eat.


Thanks for reading the DIY Tree Stump Fire Pit Tutorial!
And one more time…
~I am not a fire pit making professional, so know that this tutorial is purely my experience of what we did. Proceed with caution and safety for your own tree stump fire pit situation.~
Tim
Saturday 25th of April 2020
Thanks for posting this, and also your emphasis on Safety. I have a huge red oak which I'm just now taking below ground level. It has a hole in the center. I got this crazy idea to make it into a fire pit. The hole is deep so I'm planning to fill it up about a foot or so from ground level and ring in with old fire brick we've had for ages in the back yard. Then I started thinking "this is probably a crazy [and unapproved] idea, but let me use Google and see if anyone else is this crazy". At this moment I have about half the stump below ground level, cut pretty smooth, and more than half is still forming kind of a half circle about 10" above ground level. So I might keep it this way and there'd be like a 'back wall' to it. (I wish I could send a photo.) Everything will be lined with the brick, with 3/4" stone forming a 'floor' inside the hole. This tree was so big that even with the brick circumference you'd still have a good-sized fire pit. The crushed stone will also be surrounding the whole area around the fire pit.
Anyway, I'm just spitballin' at this point, still deciding what to do but glad there are other crazy people out there. Thanks much!
Pam
Monday 21st of March 2022
@Tim, did you ever do it? I was thinking same thing and have been googling. Either stone in middle or pour cement …or place the steel rings inside.
I’d love to know how you made out?
Patti Tucker
Wednesday 29th of April 2020
SAFETY FIRST! Our stump is now gone, but we enjoyed it for a few years while it dried significantly until we were able to pull it out of the ground easily. We have since used a store bought pit in the same spot, but are planning to dig it out properly and do something similar to what you describe.
Michele Morin
Thursday 6th of June 2019
I love this idea! And one of my favorite uses for a stump has been to turn it into a planter. I enjoy nasturtiums every year in an old tree stump.
Patti Tucker
Thursday 6th of June 2019
We see lots of stumps made into planters!
Laurie
Wednesday 5th of June 2019
Awesome. I enjoyed reading your story. My husband cuts trees, and he said that there are so many huge ash trees out there!
I just enjoyed reading this.
FYI—on mobile, it’s kind of hard to read your article and write a reply because the social floating banner cover a lot of the text and the left side of the comment box. I didn’t know if you knew that. I had to really tilt my screen to try to catch the story because of that.
Patti Tucker
Thursday 6th of June 2019
Thanks, Laurie! (also noted on the floating social buttons). Ash trees are everywhere here (old established neighborhood).
Michelle @ A Dish of Daily Life
Tuesday 13th of May 2014
We're talking about building a firepit in the pool area, but that's not quite what I had in mind. Ingenious though! We have no trees in the pool area anyhow. That was pretty interesting way to get your firepit going!
Mrs. Tucker
Tuesday 13th of May 2014
I'm doing an update on this pit soon. It has stood the test of time as the stump burns.
Vicki @ Grams Made It
Friday 23rd of August 2013
Great idea. But, not only would I need a bigger tree, I'd need a bigger yard. ;)
Mrs. Tucker
Friday 23rd of August 2013
When it came down I was horrified, then decided to make lemonade from the situation. We haven't regretted it (but we do have the yard for it).